Mayner
-
Posts
4,216 -
Joined
-
Last visited
-
Days Won
97
1 Follower
Mayner's Achievements
")


-
Probably to minimise the risk of someone working at height accidentally driving an elevated work platform (EWP) off the platform edge and getting killed or seriously injured or a worker operating mobile plant on a platform. A worker can be concentrating on the task in hand and not realise they are too close to an edge until its too late. There have been cases of EWPs overturning with serious consequences, I know of a number of accidents where workers were killed seriously injured as a result of falls from less than 2m while operating plant or on foot.
-
Worth considering changing to 7mm/O Scale if your not heavily committed to 4mm/OO due to the wider range of Irish kits available and easier to assemble/scratchbuild due to the larger size especially if you get older. David's and Galteemores models are excellent examples of what can be achieved in 7mm/O Scale by scratchbuiding and using kits. Although the CIE Tin Van kits are no longer available the JM Design ex-MGWR 2-4-0 kit is available to order and the etched parts for the MGWR Horsebox and Meat Vans are available to order with cast detail parts available separately from Dart Castings in the UK. https://irishrailwaymodeller.com/forum/57-jm-design/ Personally I assemble etched kits with a 145° detailing and 180° sheet metal solders available from suppliers in the UK, using a home brewed acid flux diluted Ranex Rustbuster (dilute phosphoric acid) an Australian product, let down with distilled water. Tool wise most importantly a 50 watt soldering iron (temperature controlled) for main assembly, with 18 and 25 watt Antex for detailed work/smaller components, 2mm & 1/8' parallel reamers for preparing axle bearings/brushes, a collection of small tapered reamers for opening out holes in coupling rods, 8, 10, 12BA taps for cutting threads in cast/sheet metal parts, collection of needle files, small tin snips, piercing saw and razor saw for cutting/trimming sheet metal parts. I built up my collection of tools over 40 odd years. One of the more challenging aspects of assembling a loco kit at the moment is sourcing the necessary parts to motorise the loco due to the decline in the number of specialist suppliers in the UK. Motors and gearboxes tended to supplied from different suppliers to those that supply wheels and other parts. Motors and Gearboxes tended to be supplied by High Level who have an on-line shop and Branchlines who advertise in the UK magazines and have an e-mail address. Wheels are supplied by Markits and Alan Gibson Workshop (AGW) who can be contacted by phone or e-mail. Markits wheels are probably the best option for OO as the wheels bolt to a squared axle with a locknut using a special slotted screw-driver and the crankpins with a similar arrangement avoiding the need for specialist quartering tools.
-
Interesting IRM announcing the relatively rare uncommon-versions of the H Van like the cut down PW, Bulk Grain and Fitted Versions before announcing the 'common garden' unfitted version of which over 1000 existed, great faith in the market/collector appeal of these models. I am impressed with IRMs modelling of the CIE fitted brake gear complete with riggings and pull rods, I just modelled a representation of the brake gear on the Brake Van being too challenging/expensive to produce from a manufacturing perspective.
-
Its possible Bullied H Vans ran on the Irish North West before the 1957 closure of the lines in Northern Ireland. There are a number of photos of H Vans in the consist of SLNCR goods trains in NW Spink's SLNCR pictorial. There is a 1956 photo of a southbound goods in the Enniskillen-Florence Court section with several H Vans marshalled towards the end of the train. There is also a nice 1957 photo of Enniskillen substituting for Railcar B on the 12:00 Enniskillen-Sligo passenger, the train is made up of three Midland 6 wheelers 2 CIE H Vans and a Goods Brake. Its likely that CIE vans that ran on the SLNCR were used for traffic from the South and West to the North West routed over the Limerick-Sligo and SLNCR. Dublin-Sligo and Drogheda cement traffic routed over the SLNCR more likely to have been transported in GNR wagons.
-
IE swapped some C Class with Vic Berry's for an equivalent number of BR MK2 coaches. At the time the Irish Government had banned new investment in the railways apart from completing the MK3 coach and Cork Line CTC projects. The investment ban was partially lifted a couple of years later with the Kildare Arrow project and importing the 201s
-
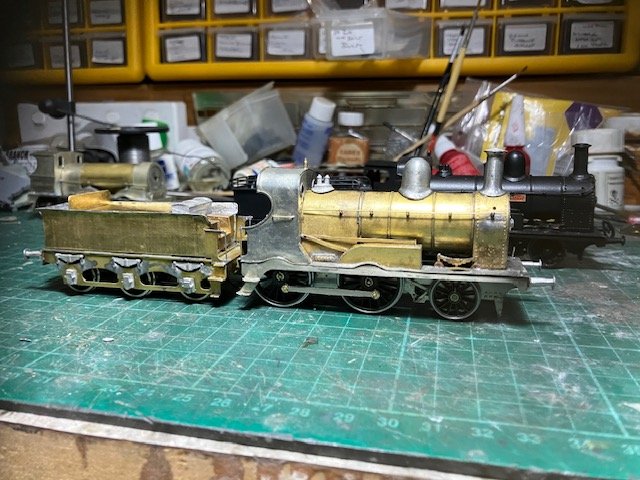
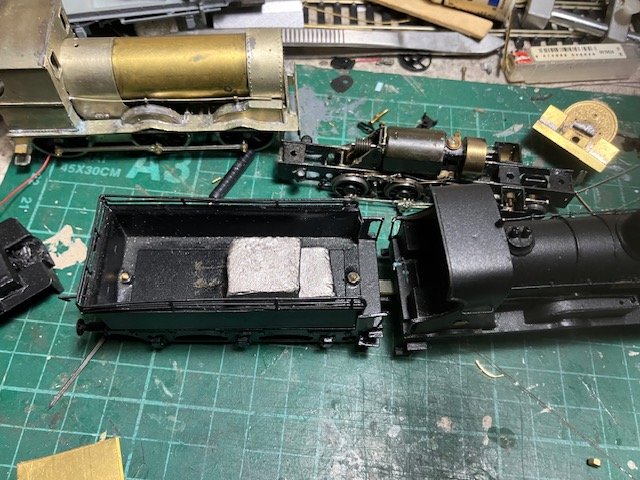
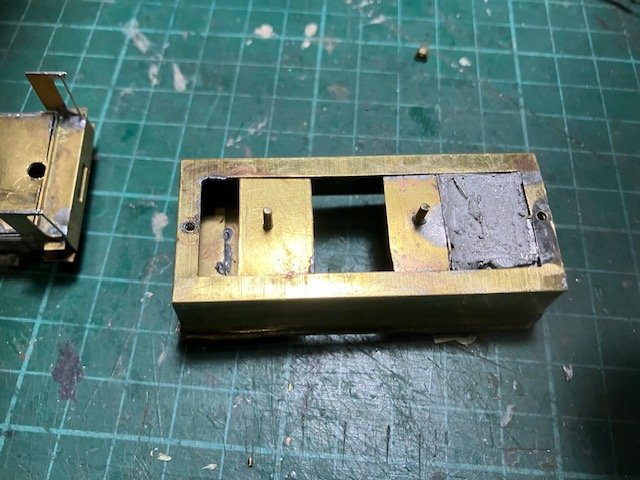
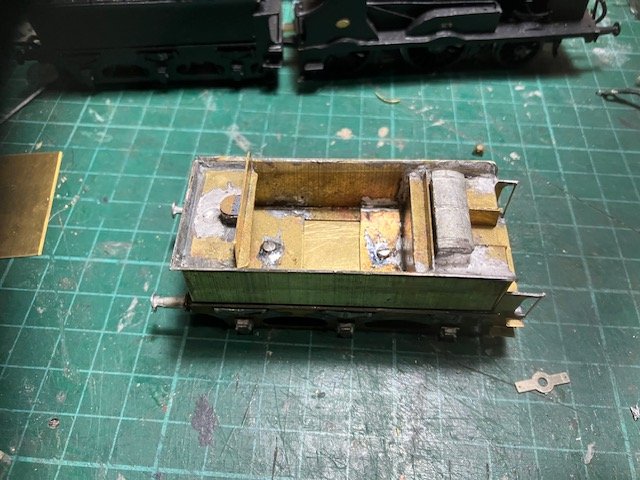
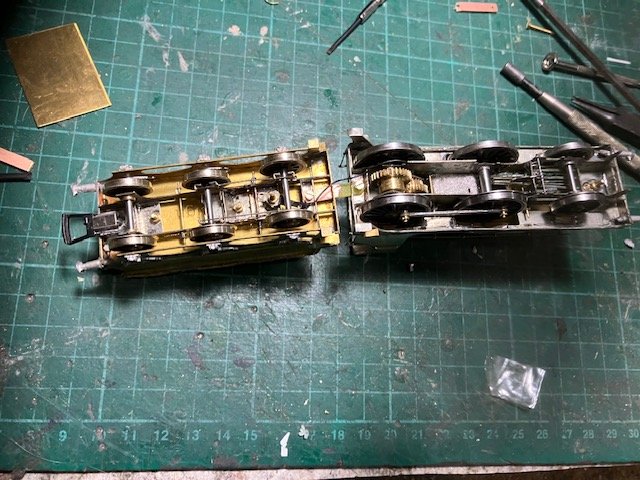
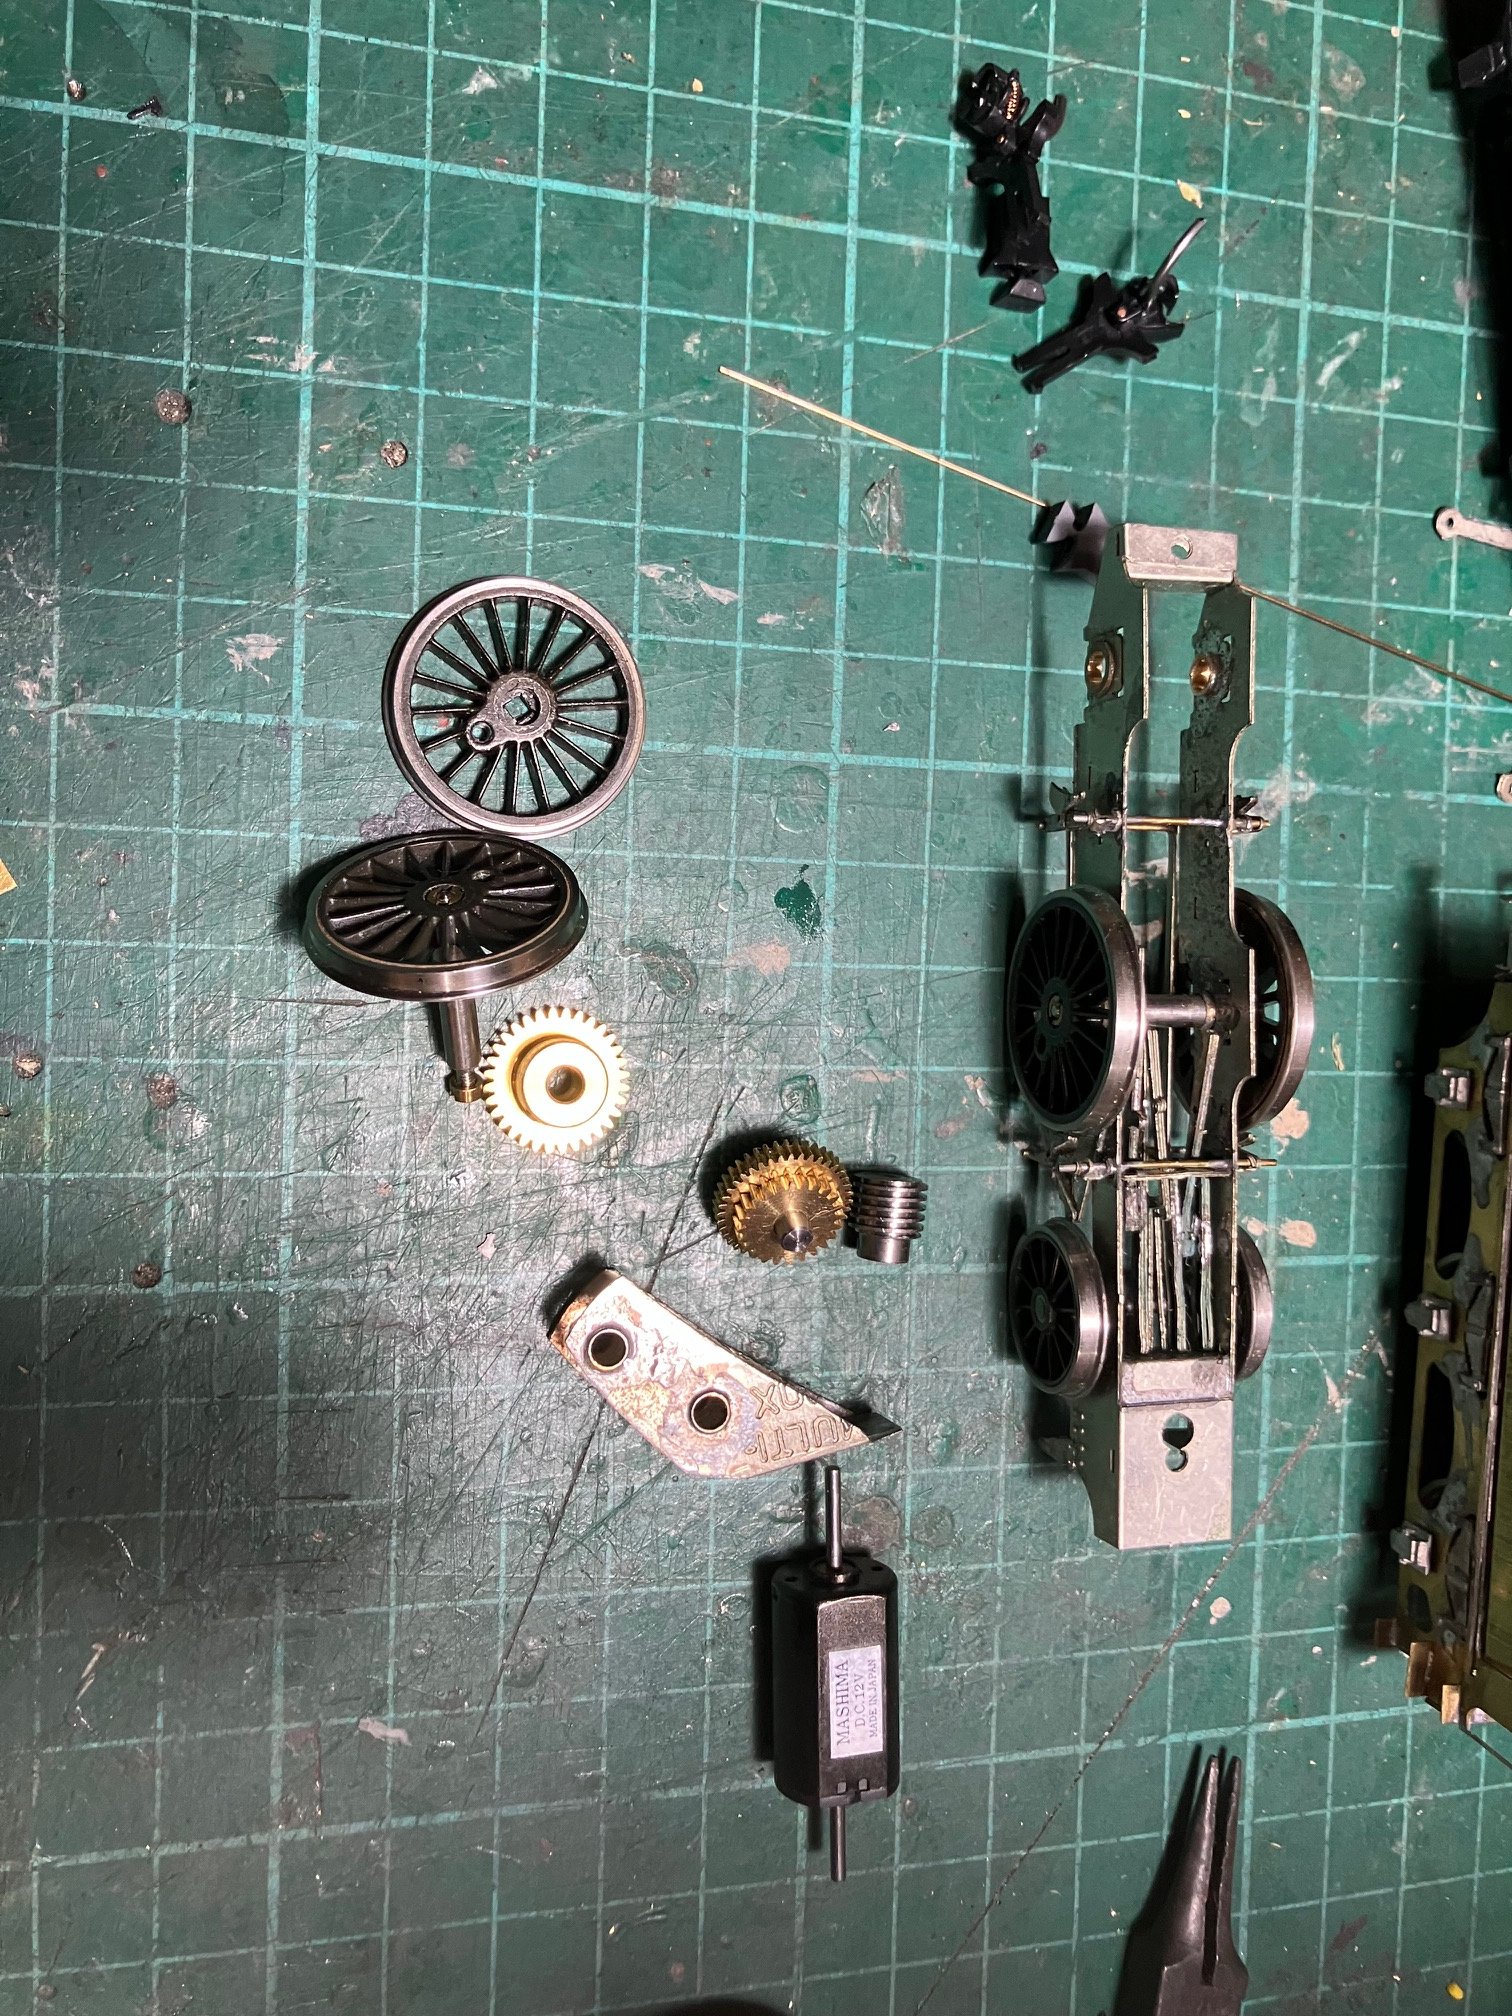
I carried out a test assembly and running of 664 before dismantling the loco for painting as 664 is the first 650 Class I assembled with a Branchlines rather than a High Level gearbox and I have changed the way the tender is weighted. 664 assembly almost complete, ejector pipe (between cab and hole on smoke box, brake gear and axlenut covers to be fitted during final assembly after painting. On earlier builds I fitted a cast weight in the tender as part of the weighted tender system I used with 2-4-0s and 4-4-0s But this time tried a different approach pouring molted "Cerrobend" /woodsmetal into a cavity formed in the tender body \ One great advantage of DC, Markits 'live axle wheels" and the "American" power pick up system is that there is no need for power pick-ups and greatly simplified wiring. One motor terminal is connected to the loco chassis, the second a flexible lead to the the tender. Curiously 664 slipped on test with a light load while Arrow is capable of hauling 15+ wagons, the tender drawbar requiring adjustment to transfer more weight to the loco. Despite the steel worm and brass gears the loco ran quietly with sewing machine smoothness. Had a quick look at 6Ts chassis nothing obviously amiss and ran after minor cleaning or the wheels/power pick ups. I will replace the leads between the motor and power pick ups, the leads look in a fragile state.

-
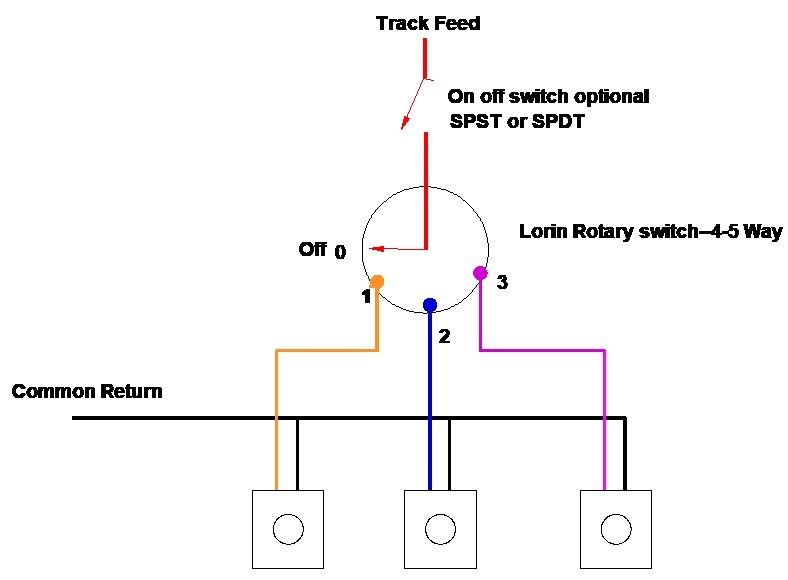
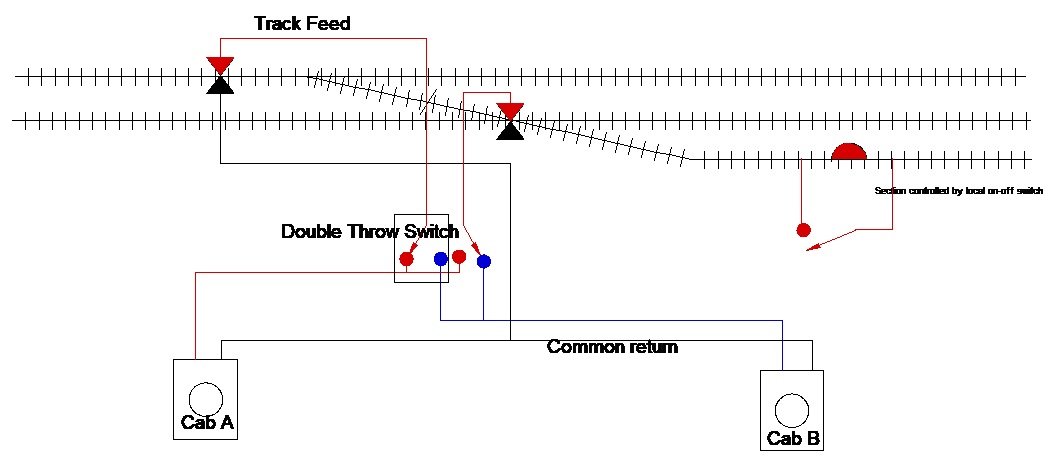
Hi Harry Track layout looks impressive! Rotary switches mounted on a track diagram is probably the simplest and most effective if you are using more than two controllers. I used a similar system on an N Gauge American layout in Ireland before converting to DCC about 20 years ago and on a Club HO American layout, I would recommend a separate on-off switch between the rotary switch and the track because the track could become live and a loco move if another operator was running a train while you were turning the switch changing power to another controller. The second switch corresponds roughly with a coding switch beneath a route setting switch on an old style American CTC panel. I used Lorin type rotary switches mounted behind the track diagram operated by a small hand knob. https://uk.rs-online.com/web/content/discovery/ideas-and-advice/rotary-switches-guide As you seem to be using Insulfrog points there is no need for an ancillary switch connected to the point to change frog polarity. I use "Blue Point" controllers for both to change the frog polarity and switch power to the yard between the Main Line and Yard Controller on my Keadue layout, bit only really works where there are a maximum of two controllers. https://uk.rs-online.com/web/content/discovery/ideas-and-advice/rotary-switches-guide Biggest challenge was wiring up the multi connectors between the layout and control panels-track diagrams.
-
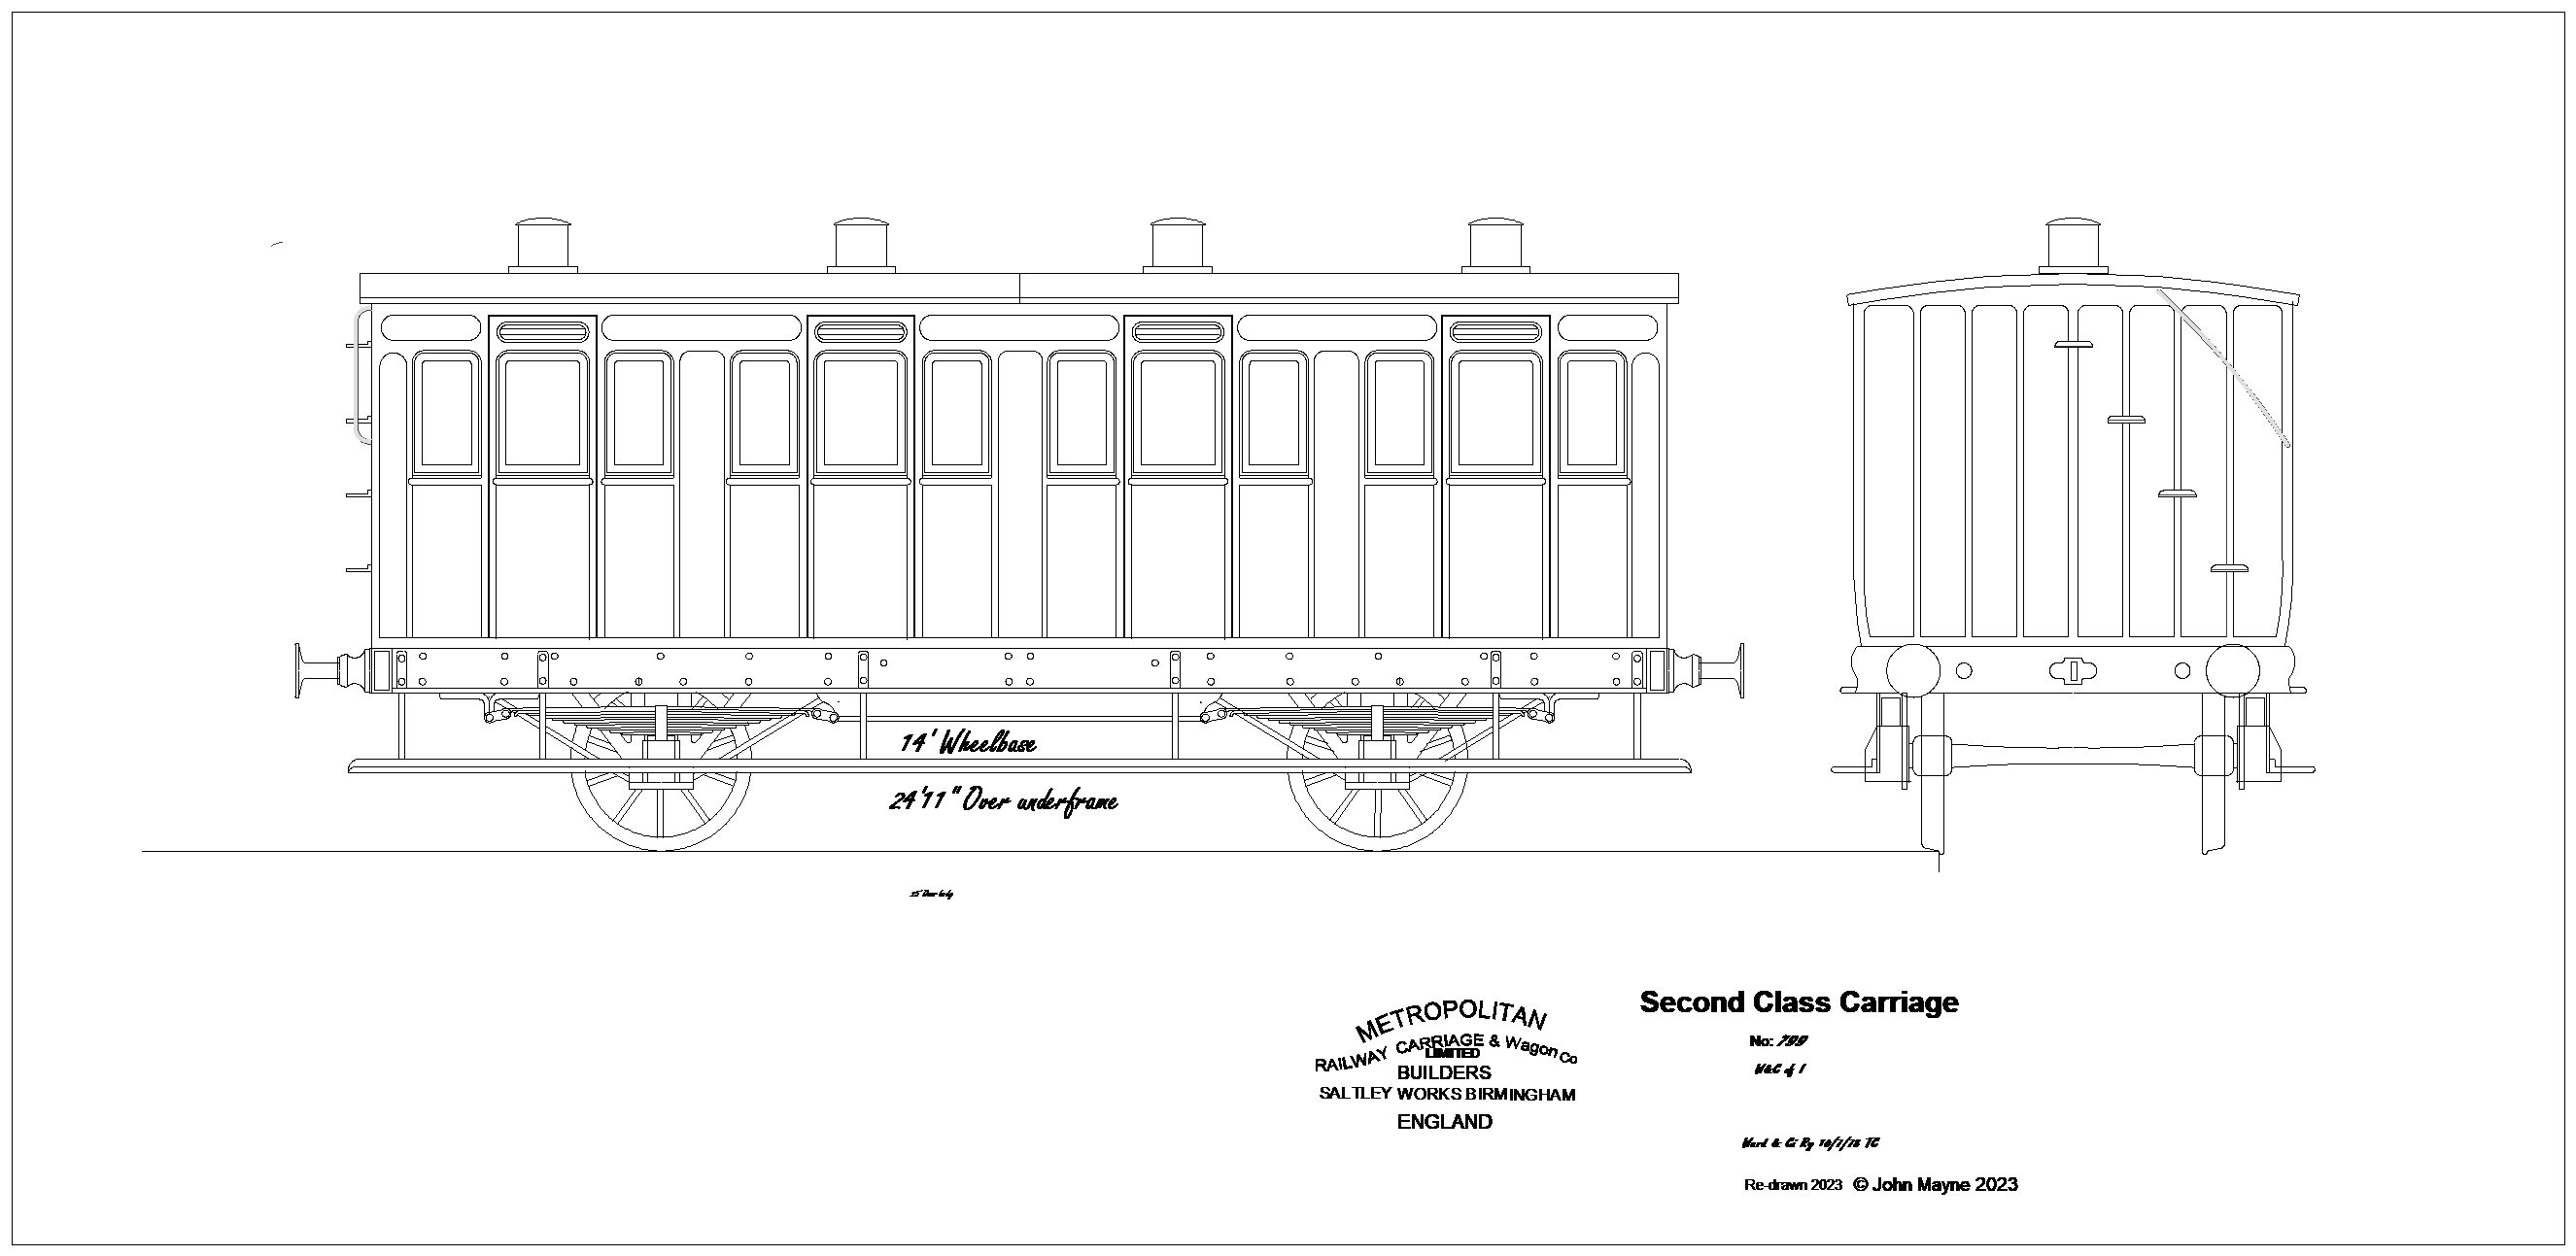
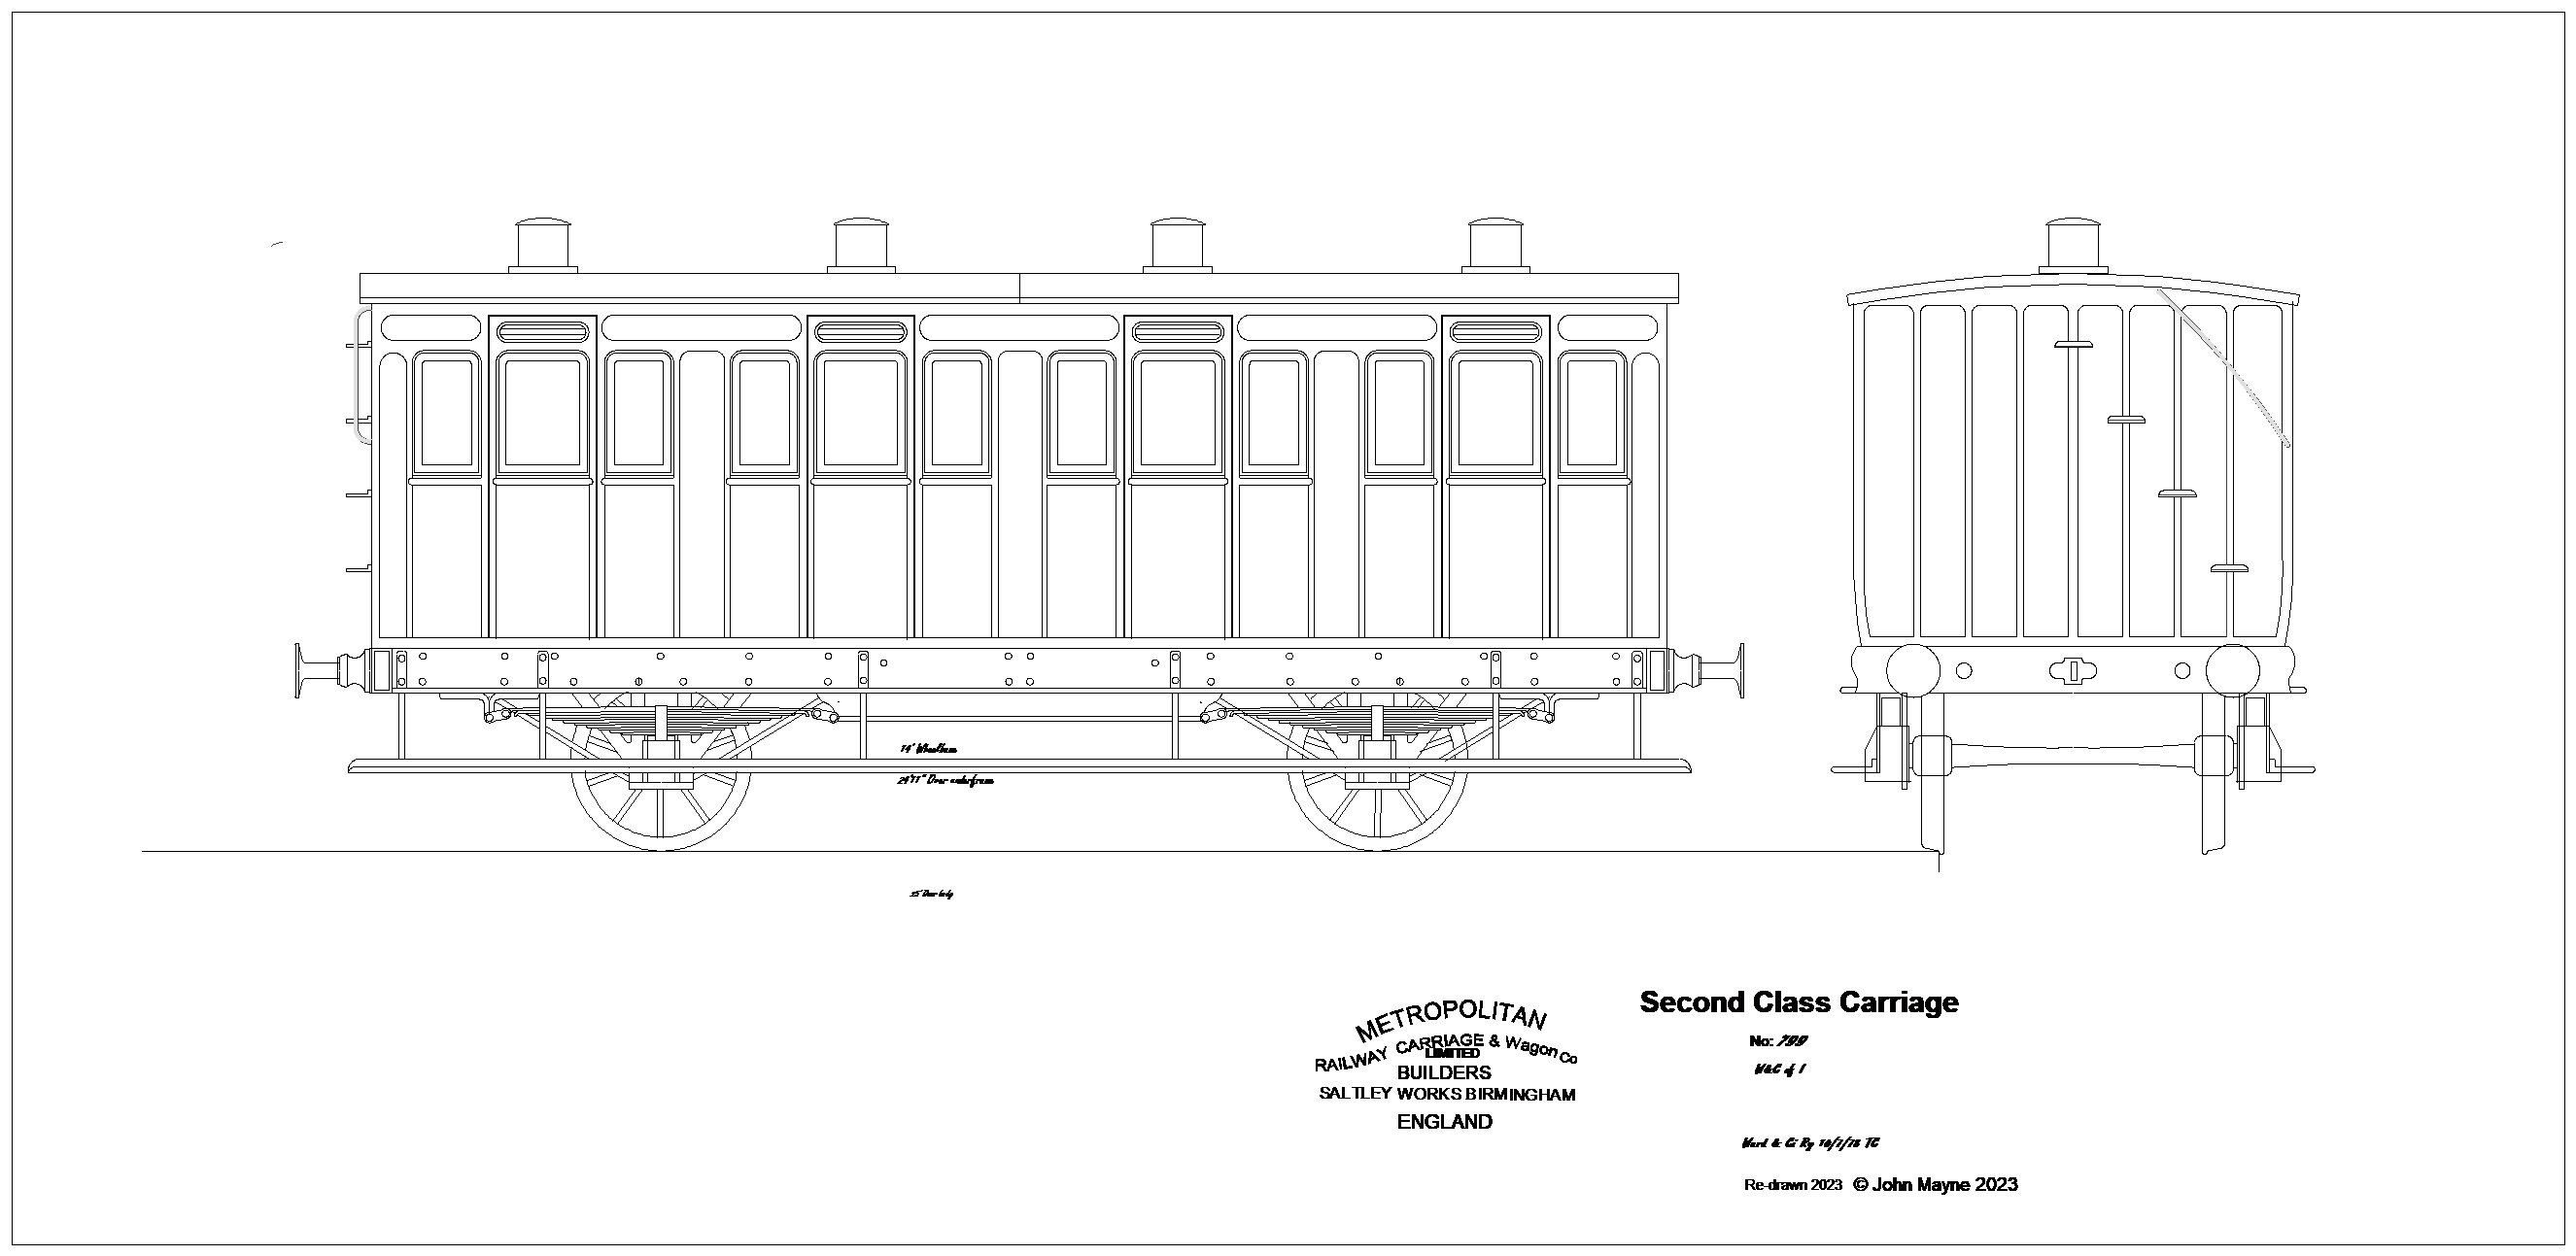
JHB my main reason for posting the drawing of the WICR 4w Composite was to demonstrate that it was of a similar length to a GWR 4 w Composite, I reproduce the drawing in a similar style to the Metropolitan GA and did not clearly reproduce the critical dimensions. For the record the Metropolitan GA specifies an underframe length of 24"11" a a wheelbase of 14'. GWR 4 wheel composite 290 under restoration at Didcot is listed as 26'10". possibly over buffers) From memory the WDLR Brake is listed as a 24' vehicle, while photos on the IRRS Flickr site indicate that Bandon, Macroom and surprisingly GSWR 4w coaches survived into GSR and even CIE days. While the photos of the Bandon and Macroom coaches indicate that though were basic in outline they appear to be 24-25' 4-5 compartment coaches rather than the shortie 4w coaches of the pre-1870s era. Interestingly there are a number of Robin Clements photos in the IRRS Fliikr site of ex-GSWR 4w 5 Compt. 3rd 933 and 4 Compt. 3rd (probably ex composite) in GSWR/-early GSR livery at the Newbridge Ballast pit in 1948. The coaches probably ex-WLWR appear to have been built as 4 wheelers rather than 6w with the centre axle removed, the panelling is similar to the Ratio GWR coaches but without the turned in ends. Unable to display or post links to photos on IRRS Flickr site 5 Compt 3rd 933---IRRS Flickr site Carriages 1/2 way down Page 4----4 Compt. 3rd 382 3/4 way down Page 4. Interestingly 933 is listed as a 6w Lavatory Tri-Composite of 1895 and 382 as a w6 4 Compartment 1st of 1886 in the 1934 diagram book Its possible the GSWR thought these coaches were worth keeping until they required major overhaul or "renewal" and not recorded in the 1924 GSWR Diagram Book in which no 4w passenger carrying vehicles are recorded.
-
The basic principal of analogue control with more than 1 controller (Cab Control) is to use either a Double Throw switch or a Rotary Switch to switch control to a section between different controllers. Some people prefer to set up the Double Throw switches (DT) in a bank on a control panel similar to a lever frame in a signal box, others prefer to locate the DT or rotary switches on a track diagram either on a control panel or a layout fascia. Traditionally most analogue layouts were wired with a "common return" direct from the track to the controller/controllers with the "live" fed to the controller through a switch, though some modellers prefer to take both wires from a circuit through a Double Pole switch to avoid any potential problems locos bridging a section. Switches I usually use a Double Throw Centre Off so that power to a section can be turned off with Rotary Switches its a good idea to wire the section through a separate on-off switch immediately below the rotary to avoid 'conflicting movements" if a number of people are operating a layout. The diagram shows the basic wiring arrangements to control a crossover using cab control with common return wiring, The main track feeds are wired through double throw (ideally centre off) switches to either cab. Single Pole Double Throw (SPDT) centre off switches are adequate for this arrangement double throw (DPDT) would be used if common return wiring is not used. An on-off switch wired to the track section can be used to isolate locos on the siding. As a general rule track feeds are located at the toe end of points, the double slip basically follows the rule effectively being two overlapping points. GSR800 what are your plans for controlling points/signals on the layout? There are other control arrangements that eliminate section switches routing power from the controller using switches operated by points and signals but requires a lot of detailed planning. I have a very basic version of this type of "route setting' on Keadue normally one controller controls the main line and the second the yard allowing a train to travel along the main line while a second is shunting the yard, however the yard is switched to the main line controller when a route is set up for a train to run into or out of the year using double throw switches operated by the points.
-
I was wondering who could possibly have commissioned such a scruffy coach when I read Eoin's thread You need a CIE publicity poster for the new diesel trains to wind up the unfortunate passengers that board the train at Dugort Harbour. The poster worked at treat at Keadue and our few remaining passengers now drive or take the bus.
-
Funnily enough the Historic Model Railway Society have builders drawings of long wheel base 4 wheelers built for the Waterford and Central of Ireland and Waterford Dungarvan and Lismore but likely to have disappeared after the GSWR takeover of the two lines in the early 1900s. The Waterford and Central of Ireland 4 compartment second similar length but quite different in outline to the Ratio GWR second. The Ratio GWR 4 wheelers are not dissimilar in outline to some ex-Waterford Limerick and Western 6 wheel coaches that survived into CIE days including the turned down ends which were unusual in Ireland (the WLWR engineer was an ex-GWR man). I assembled a Ratio 4 wheel GWR Brake end as an ex-WLWR 6 wheeler using a brass 6w chassis kit from the UK, but probably simplest to have a go at assembling a Ratio 4 wheeler and painting it in CIE or GSR colours if your unable to get a Rails CIE 6 wheeler. Eoin Murray has done a series of articles on assembling the Studio Scale Models GSWR 6wheelers on his ECM Model Trains in the Manufacturer's section of the Newsgroup and Popeye has a piece on assembling a GSWR 6w coach from a Worsley Works set of parts on his work bench thread if your interested in seeing what's involved.
-
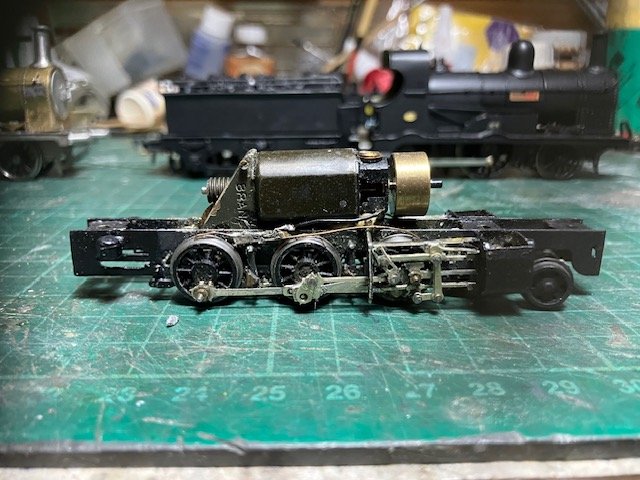
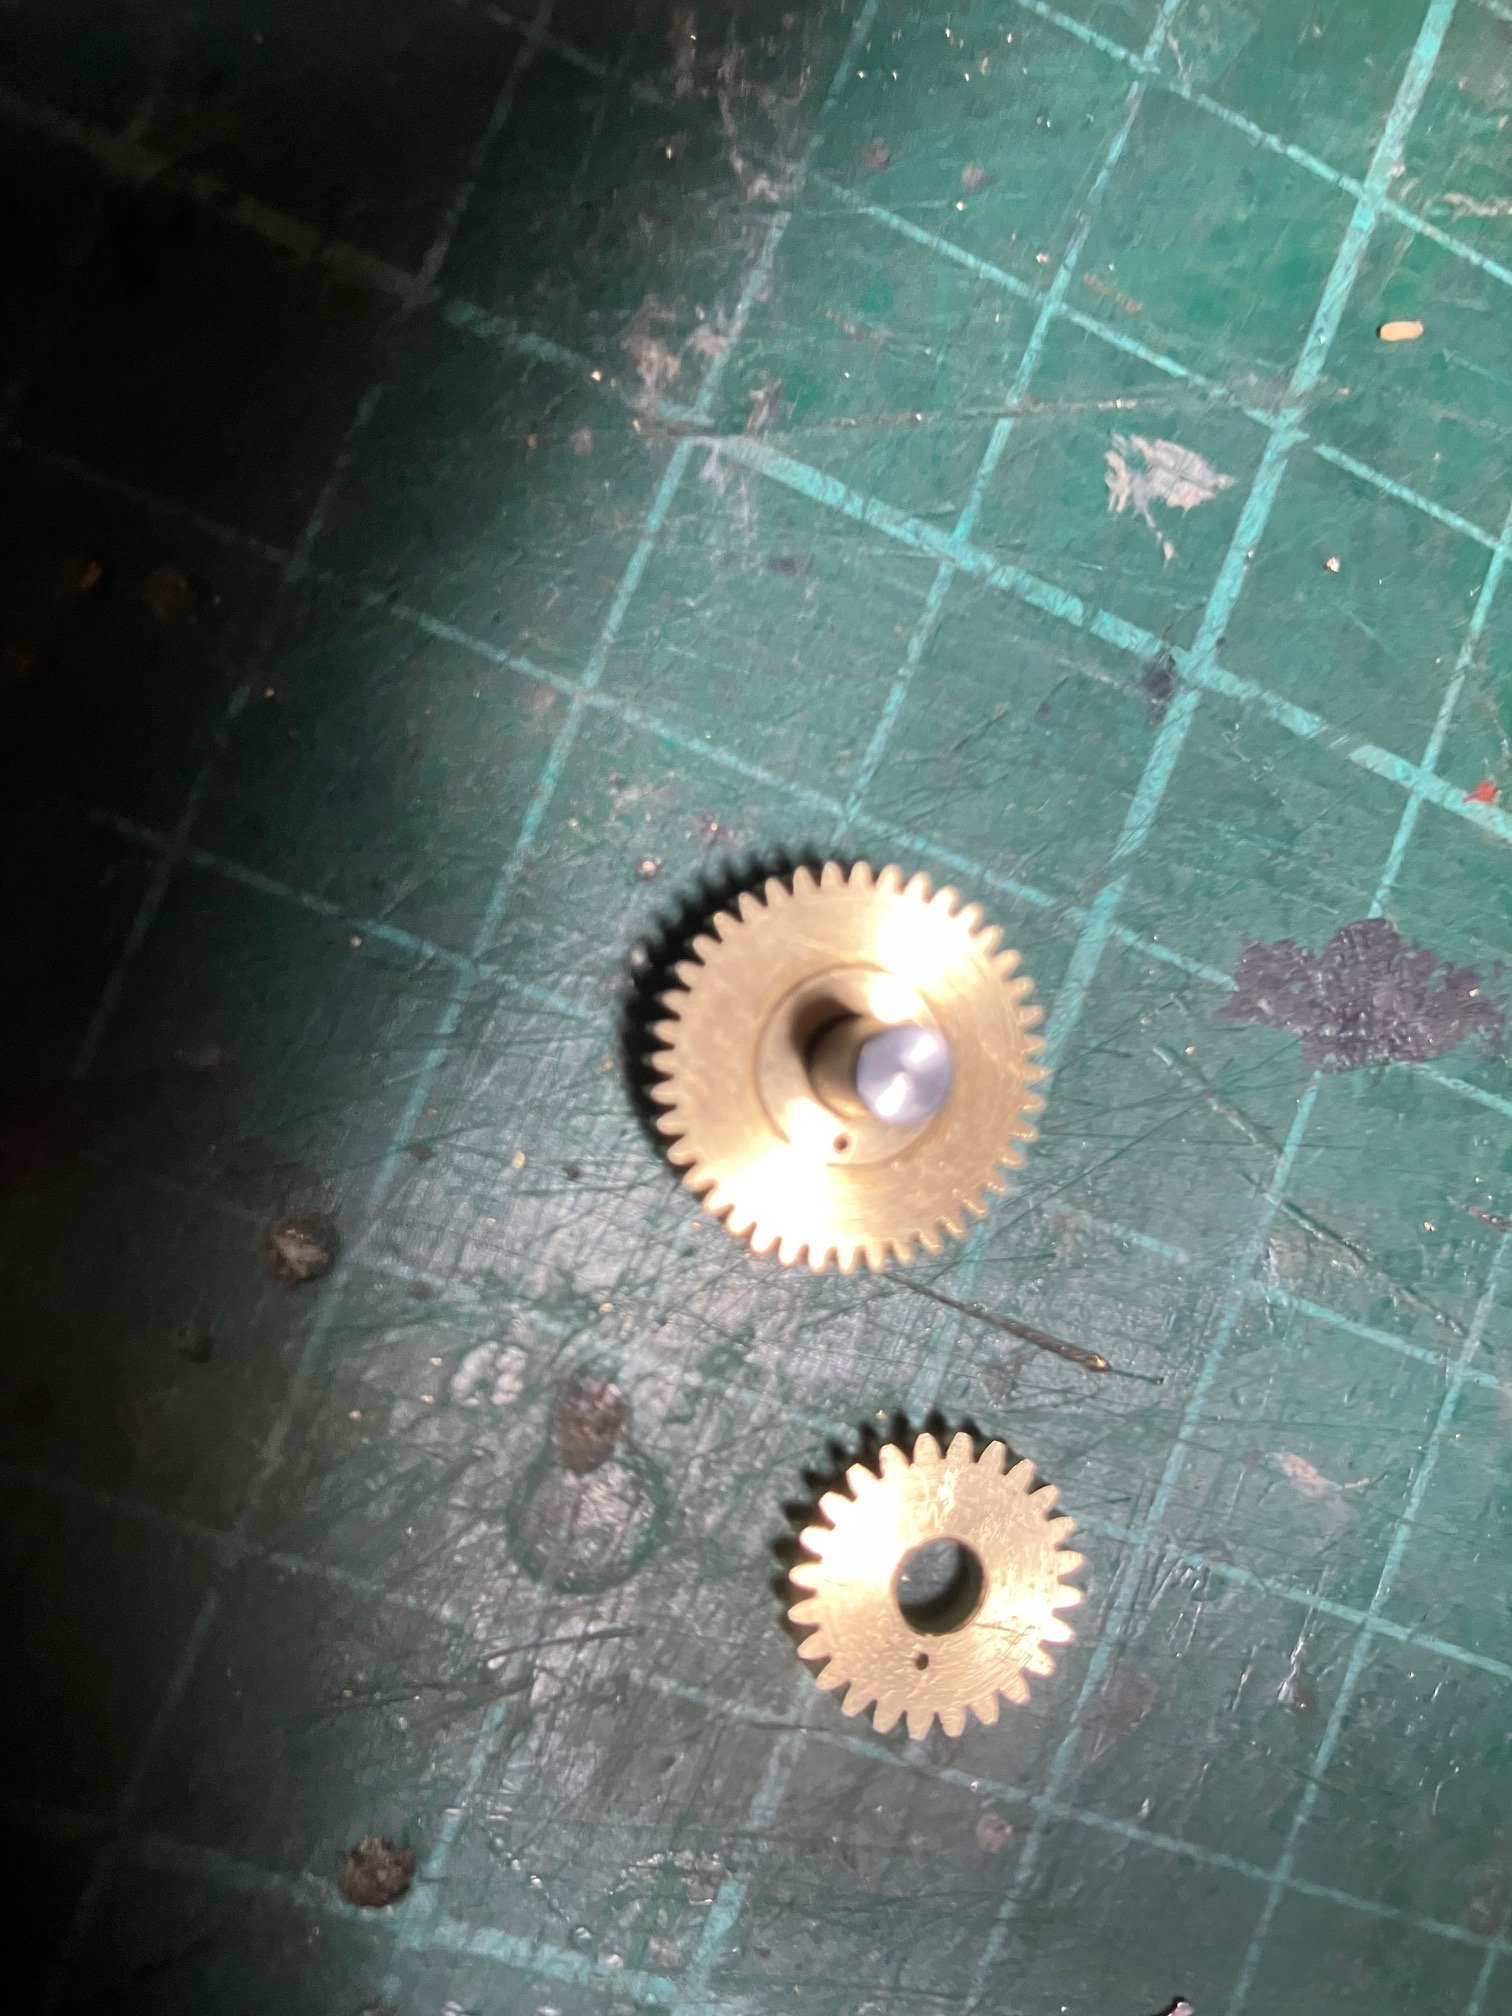
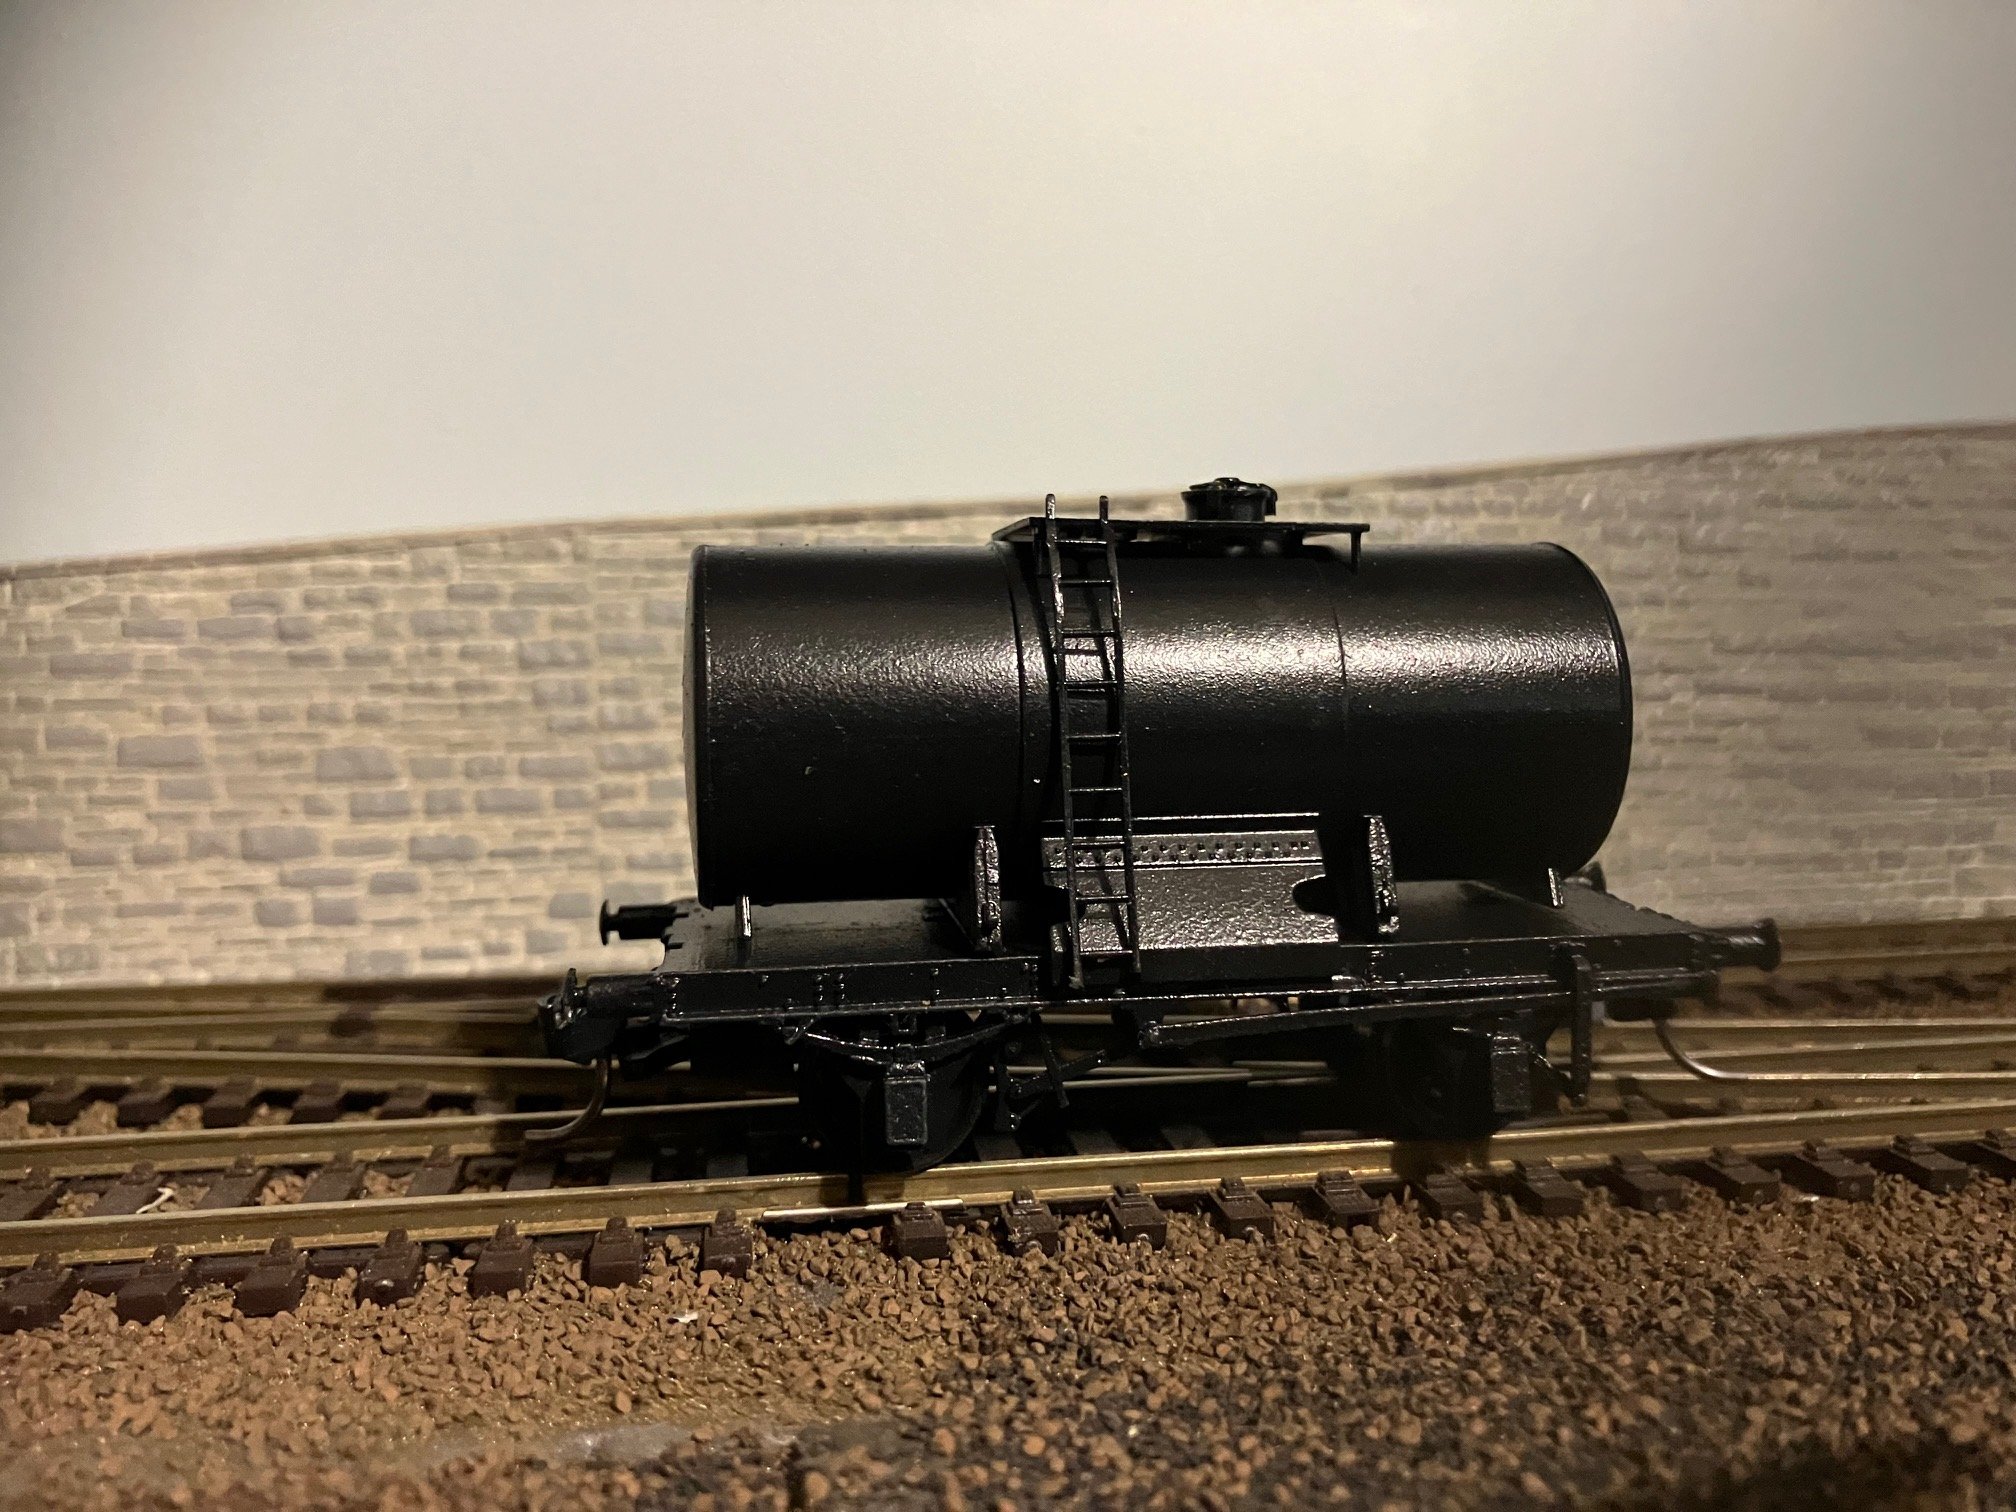
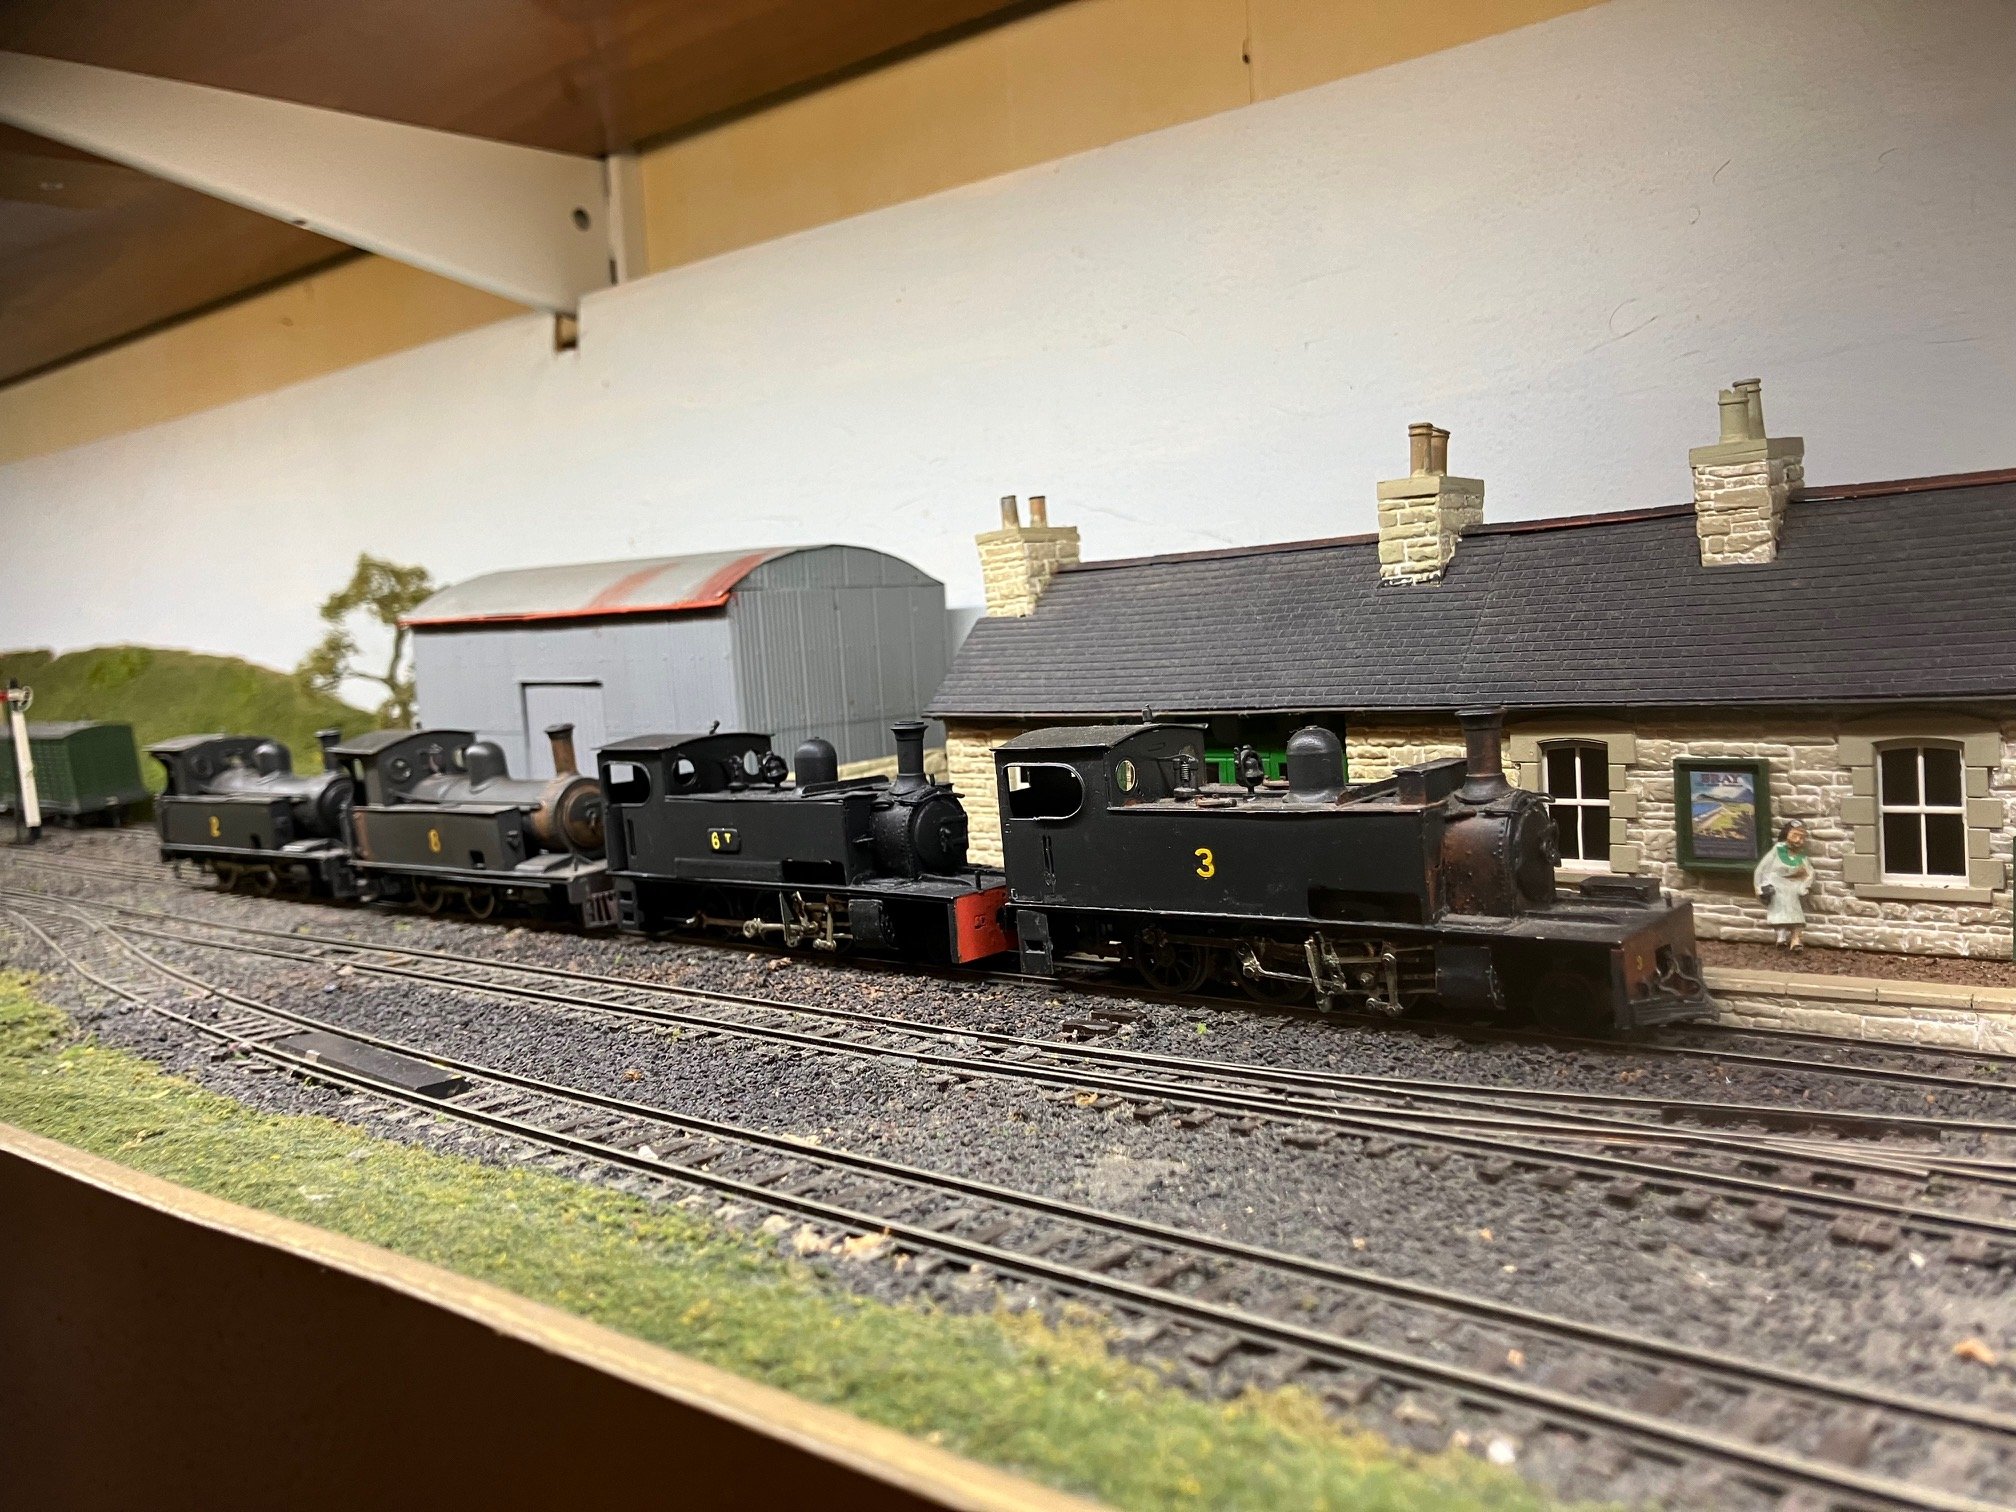
Managed to find some time for modelling today first time since before Easter. About to start the mechanical assembly and testing of a 650 Class 2-4-0, 1st job was to drill 0.5mm holes in the 2nd stage reduction gears in the Branchline Multibox gear box used in this loco. Usually I used to glue the two parts of the reduction gear together without any long term problems. but decided a brass pin was a more legitimate of an engineering solution. In the past I used to use Multiboxes to motorise large kit built BR steam locos like Black 5, 8F, Bullied Pacifics before using HiLevel gearboxes from the early 2000s, but picked up a number of Multiboxes and Mashima motors from Branchlines while Hi-Level was unable to source gearbox parts from suppliers during Covid lock downs. I fitted a Mashima motor and Multibox in a GSR 52 Class for a customer a couple of years ago which was suprisingly quite despite the brass gears. Multibox in pieces awaiting final assembly step down gears beside worm. Drilled the holes with a 0.5mm drill in a pin chuck-slowly and carefully, especially as my hands are no longer as steady as they once were. Mock up of a CIE Bitumen Tank Wagon using a tank from the IRM Weed Killer train set and a "spare" GSR/CIE wagon chassis. I bought the IRM set mainly for the bogie flats and produce my own chassis for the tanks. The Bitumen tanks appeared to be a lagged version of the tanks used in the Weed Killer train some of which ran on GSR/CIE pre-Bulleid wagon chassis. I may 'lag' the tanks with a card or brass overlay, the lagging was 'notched' to fit around the tank supports and saddle or leave as is. Initially thinking for using the tanks for Bitumen traffic from an off scene depot on a OO Dockside shunting layout The other job was to 'pull out" the four 3' gauge locos on Keadue not run in about 2 years and see which were capable of running. Ironically 6t that had a cosmetic and mechanical overhaul during the 2020 Covid lock down that was a non-runner , but all require some form of adjustment. Biggest challenge will be sorting out the Kadee couplers on the two 'Dingle tanlks" which will involve modification to the front and rear frame spacers but should improve the reliability of coupling and hands-free uncoupling. Greatest priority at the moment is finishing a 650 Class for a customer, but repair and maintenance on the narrow gauge layout can provide some diversions in the evenings.
- 340 replies
-
- 10
-

-
Computer threw a wobbler while sending that post.
-
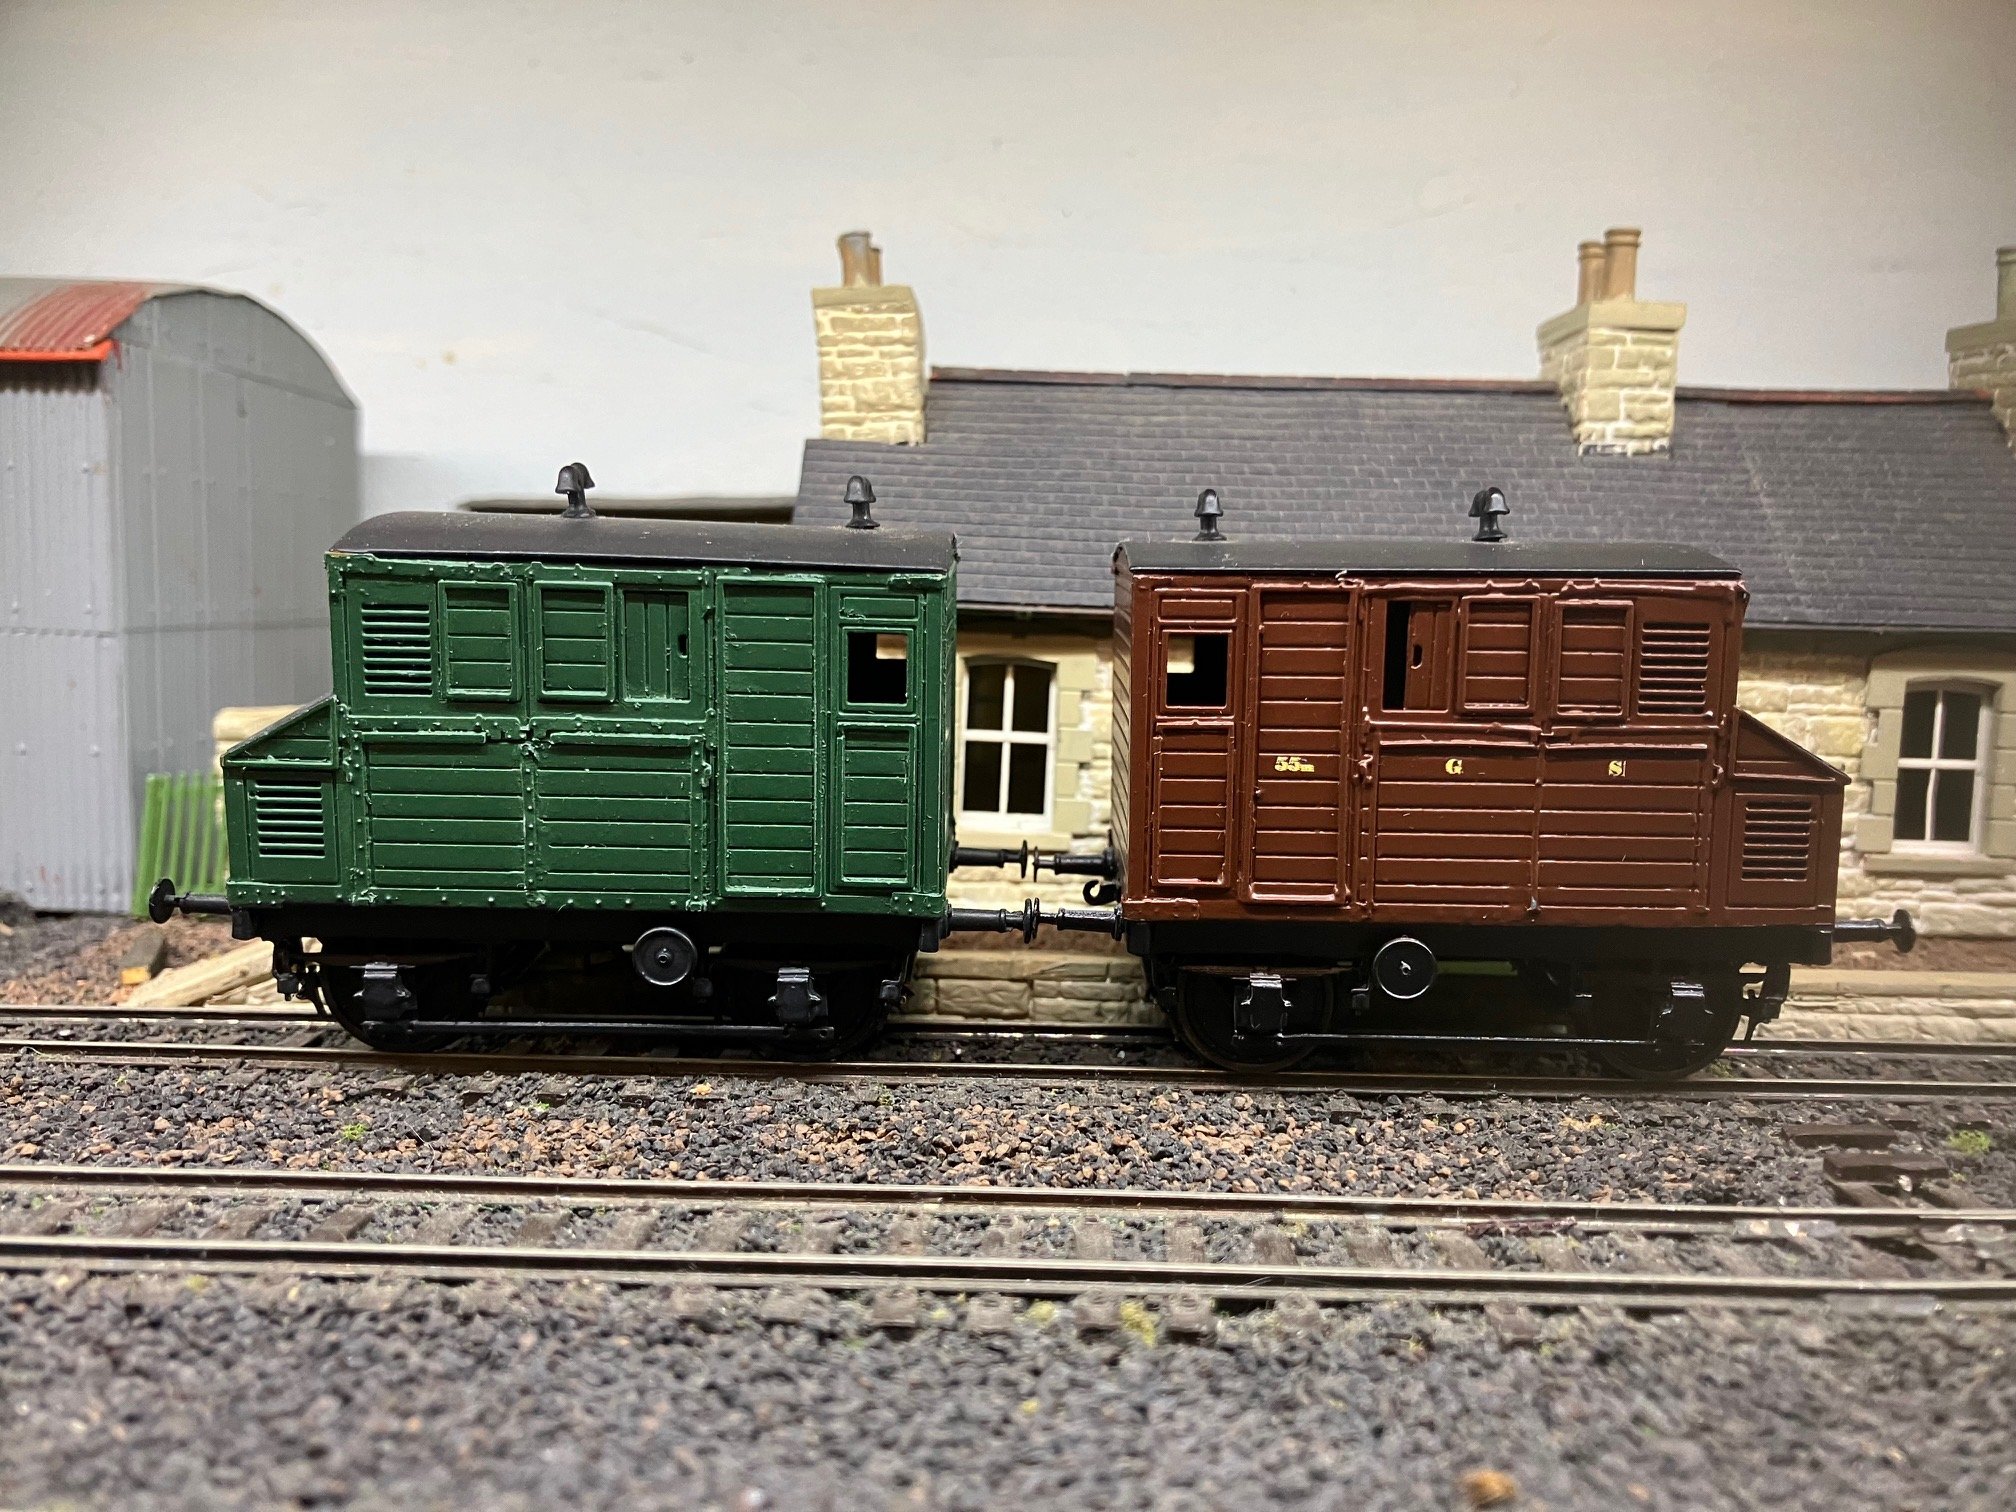
Released a model of a MGWR Horse Box about 10 years ago. Sales were so poor (total about 6 sold) that it was not worth re-ordering the cast parts to do a repeat or hold as a stock item. The etched parts are available to order and sold a few down the years and even produced a 2mm version as a special order. Castings were produced by Dart castings from my masters, the castings are in the Dart catalogue with the exception of the handbrake wheel.
-
 Originally the Mails Complex opened the early 70s in connection with P & T new Sherriff St mail sorting office allowing mail and parcel to be transferred directly from the sorting office to rail rather than road from the GPO to Connolly and Heuston. The Mails Complex also served as another pair of platforms for Connolly during busy time, remember disembarking from a train in the Mail Complex at some stage during the 80s. The building used a combination of concrete block walls and precast columns and roof beams. popular for industrial buildings at the time being cheap and almost maintenance free. The Sherriff St mail sorting complex was unpopular with P & T Staff with dust from the adjoining coal yards causing problems and abandoned in the early 90s possibly before the Mail Trains ceased, a far cry from the Residential and Financial Service area that now occupies the Custom House Docks.